Wednesday, October 17, 2012

DSDN 142: We Have Bark! And Working Suns!


So, I've managed to meld the two codes, and get the suns causing the trees to grow. We have a success! However, I'm still working on the issue of the suns relying on a refreshing background while the tree does not. This is however only an aesthetic decision, so that's something I can leave till a little later.
One of the things that I want to have functioning as well as the tree growing is that when it ages, it also changes colour from green to a more bark-ish brown. This was easy enough to set up in the ageing loop, and I got a tree that went from green to brown and then went on into red and then hot pink. 
While this did make me laugh, it's not exactly what I wanted. Mistakes make learning so much better though! Without this mistake, I wouldn't have taken the initiative to adapt the code further to suit my needs!

So, to rectify that issue, I placed some lines of code that inhibited the growth as soon as it got to the colour that I wanted. This resulted in a very pleasing brown finish when the tree reached "maturity".
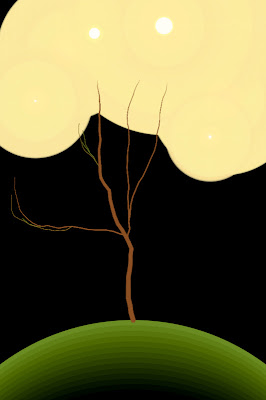

Another part that I discovered when implementing this is that each branch ages separately, rather than each individual segment of the tree ageing separately, as I had anticipated. This actually looks really cool, because then there are little green segments that show new growth!

And now to the major clincher. I managed to fix my suns! That's so damn exciting. After thinking about it long and hard, I figured out that if I had a growing black circle that was drawn first before each frame of the sun, it would be just like if my suns were being refreshed! 

Managing to mitigate the problem relatively simply without having to re-write masses of code is great, and I can definitely say I'm very happy about that. The suns look great, however, because they are refreshing 60 times a second, there is a slight problem when they overlap with the tree.

What happens is that the tree flashes at a much slower framerate than the suns, causing it to feel very erratic and almost as if the tree were in pain. Now that's really interesting, because one of the things that I wanted to do in the beginning (when I had no idea quite how hard this all was!) was to make the tree die when the sun was placed too close to it. Now, I still don't know how I would code that, but this might be a simpler alternative to work with.

For some reason, you feel quite bad when this little tree flashes like that. It feels really painful, so it actually fits perfectly with my theme of care and prevention of damage. The suns don't actually damage the tree at all, it just flashes in an awful sort of way! Now, to make the flower!

Tuesday, October 16, 2012

DSDN 104: Final Render Developments

So, now that I've got my composition nailed, I can start perfecting my rendering. I've decided to go with a material that best emulates the material that the actual model is made of in real life. Sadly I'm having to create that material myself, so we'll see how it goes!

Compos Render 1
This first render is the ideal sort of colour I want for my main model. It's pretty much the colour my model has come out as, the only problem being though that this material isn't transparent at all, which is a bit of an issue, considering my model is pretty much translucent.

Compos Render 2
This render shows the main model is now a lot more transparent, however it's pretty much lost any semblance of colour, and it's also letting a lot more light through than I want it to. The light is completely splashed all over the sides of both of the other models, and they seem to lose a certain degree of their depth, too.

Compos Render 3
This render here is definitely starting to head down the right track. The material is sort of starting to take on the shade that I want, and the amount of light starting to fall through is really good. However, it's still got a bit of a grain to it, and doesn't really have the frosted glass look that I'm going for at present.

Compos Render 4
This one is almost there. The colour is perfect, and the transparency is jsut right. However, the surface is still too damn reflective! A frosted-feeling model shouldn't be reflecting like that at all.

Compos Render 5
Ahhhh...now this is what I'm looking for! That render could quite literally be the actual model sitting there. I'm actually very lucky that I managed to get the material to this point! However, for the final render, I want the proportions to feel even more stretched, so I think I'll pull the top edge of the render down a tiny bit, just to pull the models up the frame a little and make the image feel even wider.

Final Render
I pretty much maxed out all all the settings for this render. And it really does look amazing, but I feel like I've cropped away too much of the top layer now. The image feels a little bit short. So for my final final render, I'll give it a little more in height, but not as much as was had before. I also get an ever so slight vibe that the image isn't centred and that the shadows at the bottom of the image aren't quite parallel. So, some minuscule things to fix up for the ultimate render!

DSDN 104: Concepts For Photography

So, for this project I decided I would have a look at some photography precedents as inspiration. I found some 3D printed objects that had been photographed in interesting ways, but that were also beautiful in their own right.

One of the things that I have begun to realise when looking at these images is that there is a major difference between a product shot and a shot that is really trying to sell the product. And yes, there is a difference. There are amazing product shots, and often these look simply stunning. They simply show the product with perfect lighting and shadow and how perfect it is.


Sometimes however, this isn't always the best thing. Yes, product shots show the product in it's most flattering light, but that might not be what you want to achieve with the look of your product. Maybe your product is about getting dirty. Maybe its ability to stand up to the weather is what you're trying to show. Maybe you're trying to show the inspirational elements for the product's design, in which case it might be presented outside in the midst of a plant, since it was inspired by a flower, or possibly it was inspired by the water, so maybe it needs to be in water to convey that meaning?

Image acquired from: http://www.3ders.org

This flowing blue piece could possibly have had a more interesting setting to convey its roots far stronger. We really don't get very much from where it is presented in this product shot.

Image acquired from: http://www.shapeways.com

Products serve a purpose, so maybe showing how they get used would be the ideal photo? This cutlery set that was 3D printed in silver shows a clear purpose, and seeing it in action makes this such an effective piece of photography. I love this cutlery set. It conveys perfectly the idea of loss of structure and decay, which is exactly what you don't want to associate with your food.

Ideas!

Monday, October 15, 2012

DSDN 112: The Future Can Be Better

So, today in class we presented our storyboards and told our tutor groups our idea for our short video clip. Mine was met with relative glee. People thought it was a really novel and less blatant-product-explanation approach to the whole project.


The robot character was one of the elements that people really liked. The idea of a shitty future was rather amusing as well, however, the general consensus was that the concept felt unfinished, which I definitely agree with. The idea that the robot could then start chasing the user and the user could then use my device to escape and find their way back into their own time was thrown out there.

So I decided to significantly extend the length of my video to include an element about how the user then steals the tech "the only cool thing the future has", which then evolves into an awesome chase sequence with the shitty cardboard android running after the hero, shouting "EXTERMINATE" as he chases them. Meanwhile the hero uses the Geo-Tool to escape the android and then make their way back to a time machine that transports them to their own time, where the Geo-Tool promptly blue-screens and ceases to work, to the hero's obvious frustration.

Next, the script!