
Showing posts with label INDN 212. Show all posts
Showing posts with label INDN 212. Show all posts
Monday, November 25, 2013
INDN 212: Featured!
So, my team and I today got featured on the awesome design blog Yanko Design today! I'm so stoked! Check out the link on Yanko to see more!
Friday, November 8, 2013
INDN 212: Videographical!
We created a video to show how our design worked, as well as the research behind the sizes. I think it's neato. That, plus Cole does an excellent job of playing the subtle star, while Ash and I did all the work behind camera. You should definitely check out Cole's blog here: http://coleholyoakedesign.tumblr.com/ and Ash's blog here: http://amsdesign-indn212.tumblr.com/
Thursday, November 7, 2013
INDN 212: Vertical Garden Design Presentation Slides
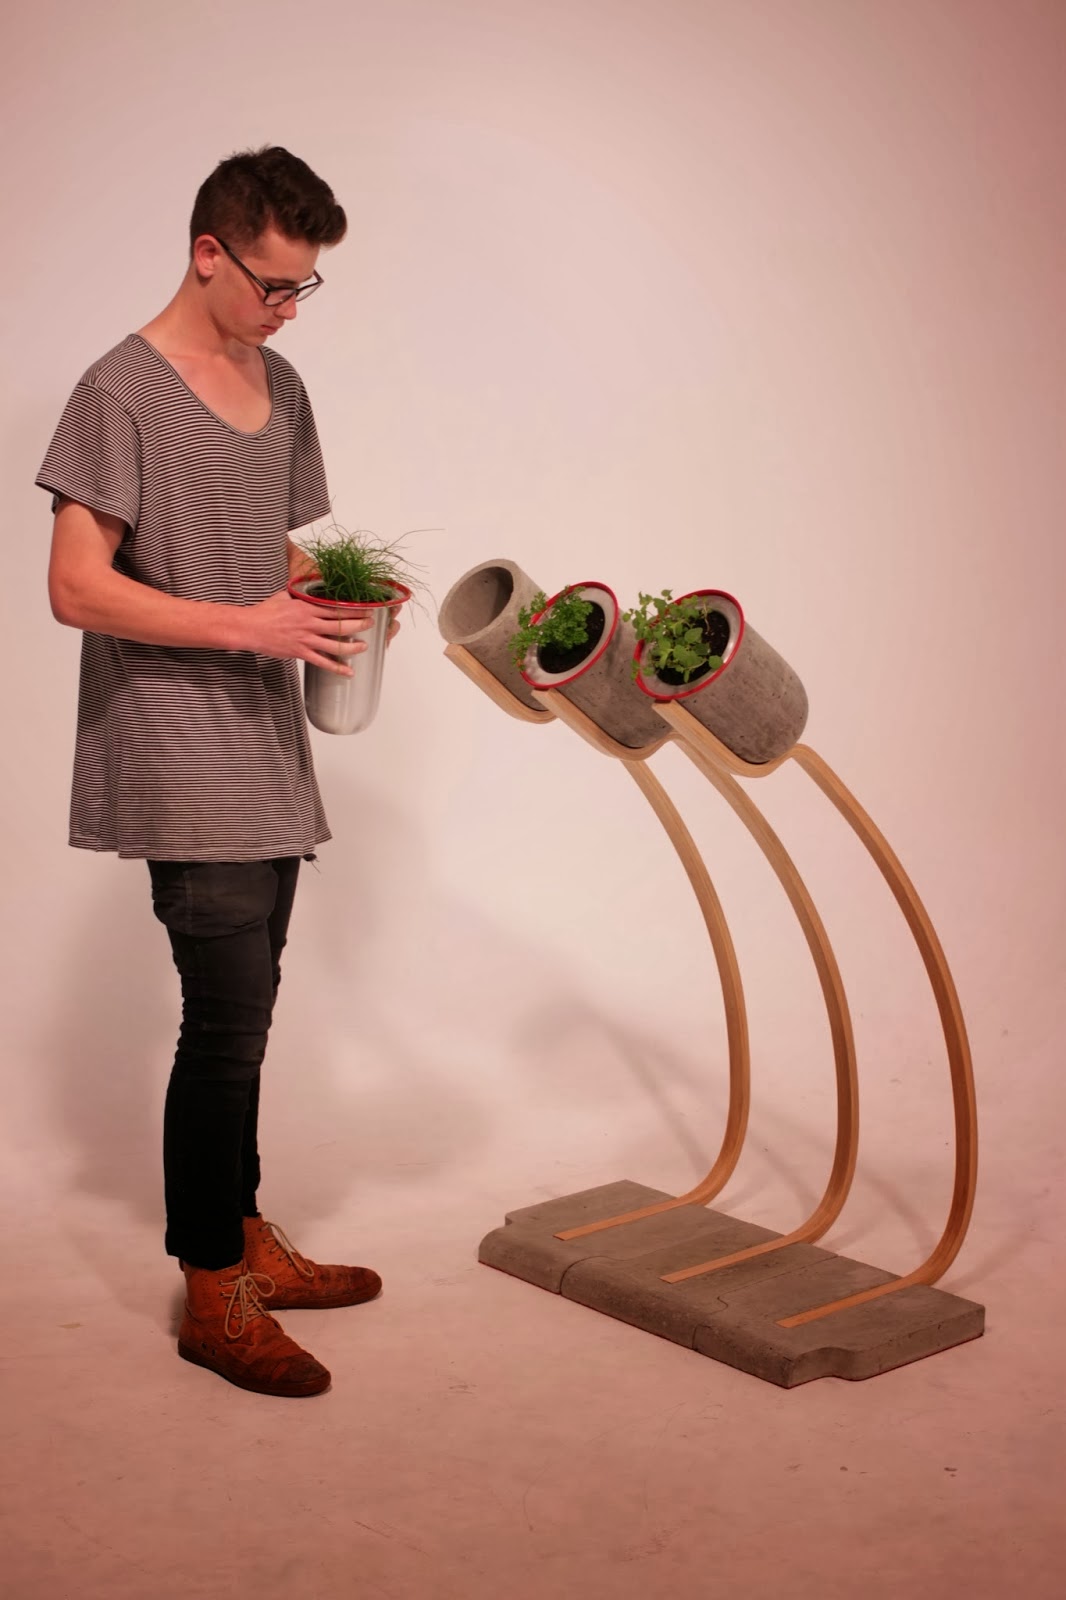
These were the final presentation slides for our group project Urb-Garden, a project based around bringing herb gardening into the home in a sculptural, aesthetic way. The primary focus of the project was centred on making something that would alleviate back pain in avid urban gardeners. The design was developed extensively over a 3-week period, whereupon we began the production phase, which lasted 3 weeks. The final design is something we're really proud of, as it fulfils the function we set out to devise, as well as being a very aesthetic piece that speaks of simplicity, but upon closer inspection, reveals a far more extensive development in production and assembly techniques.
 The final piece consisted of three iterations that fit together in a puzzle-like fashion. Designed as modular pieces, the design would allow users to choose as many as they felt were necessary. The base and attached pots were made in fibrous concrete, to ensure the best strength to weight ratio, while the stems were made of steam-bent laminated strips of Ash, an extremely strong and beautiful yet labour-intensive solution. We then had aluminium pots spun by a professional metal spinner that would fit into the concrete pots.
 We wanted to create a highlight on the design itself, so we spray painted the very edges of the metal pots red, a colour we also duplicated in the felt we used on the base of the concrete. This colour is both striking as well as beautifully contrasting with the green of the plants, an effect we chose intentionally.
 What we ended up creating was a piece that was quite dynamic and had a good flow of usage, as well as a really quirky motion that made the whole feel quite lively. This, combined with the red accents, made the Urb-Garden a really satisfying design.
 The last element that we wanted to include in the presentation was the idea of there potentially being a "collection" of different types of Urb-Gardens. This particular variant that we designed was all about being free-standing as well as providingeasy access. We had ideas for alternate variants that could be plays on the original, with one idea being a smaller version that could sit on a table or bench if the user had limited floor space. Alternatively, if the user wanted a more permanent installation, we devised a wall-hanging variant, whereby if the user had a more permanent residence, they could make a more permanent change.


Wednesday, November 6, 2013


Tuesday, October 22, 2013
INDN 212: Early Contributions
The design that we'll end up with is definitely not going to be any one of these, but I still like seeing my process abound on my blog. And I feel like the process involved in this project is HUGE. We've gone from design to design to design. And it still gets better with each step.


Wednesday, September 25, 2013
INDN 212: The Heat Indicator/Board
So, I have 90 seconds to present, eh? Elevator pitch? I can do that. I hope.
 This is a person like me. I burn myself inadvertently on hot pots and pans all the time. It's gotten to the point where I will actually hurt myself and it's no longer funny little incidents. You'd think I'd have learnt by now. But no.
 The initial element of my idea is to create a strip for a pot that essentially displays whether or not the pot is currently hot. This visual cue could also be very easy for parents to teach their children to observe. Keeps the cue very high, but the intrusion on form minimal.
 I wanted to expand this into something more, something that would actually work as a standalone product. I devised an idea for a heat-measuring food presentation board. It would serve as a board for a hot pot, as well as a display for the heat of the pot in an appealing, aesthetic way. I also wanted to combine it with multiple other functionalities that would allow the board to do more than the heat strip would.
 While the pot-based heat strip would be super simple, this board would tell the user how hot the pot is, which could be used to both optimise serving temperature, as well as a further warning for individuals contemplating touching the pot. The board could be a self-contained unit, turning on when the pot was placed down, as well as turning off once the pot was no longer hot. The board would also be used to hold other condiments/additives for the meal.
To make this project come to life, I'm going to need: people with skills in Arduino programming, people with a good sense of form and aesthetic (Which I know all of you are, otherwise you wouldn't be here!), and people with a great knowledge of materials and construction/production techniques.


To make this project come to life, I'm going to need: people with skills in Arduino programming, people with a good sense of form and aesthetic (Which I know all of you are, otherwise you wouldn't be here!), and people with a great knowledge of materials and construction/production techniques.
INDN 212: Developing A Presentation 3D Model
So, now that I've got my idea sussed, I decided to develop a 3D model and a render that I will be able to show my class. I'm really liking the food presentation board, as I feel like this still has a lot of potential to be a very beautiful, self-contained piece of awesome. In order to divine an aesthetic, I had a look at common forms and colours associated with heat. I want to use a clean and minimal aesthetic, using red as a significant highlight colour, but then have the red actually recede to non-existent when there is no heat at all.
So, with that in mind, I developed the first form of the Heat Indicator/Board.
 This first form must have been developed when I was completely and utterly smashed, as for some strange reason, I have three completely independent components indicating the heat. Fortunately I noticed it yesterday and started working on a new and improved version, with more functionality and a simpler design. The most important element of this design is the red ring, which would activate as soon as a hot pot or pan was placed on the central plate. This panel would be of course heatproof (metal) and have a temperature gauge built into the middle, allowing that data to transmit to an arduino, which would engage the other two temperature gauges.
 I still want to make a pot have its own heat indicator, as I feel like that is an intrinsic part of my vision as a whole. Plus, it gives the pot an indicator outside of the board as well, which is the direction I originally wanted to take.
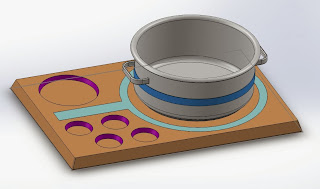
 So, this is how I began the design for my board. I wanted all the lighting and etcetera to be recessed and flush with the board itself, so I had to start that section first and prep the sections to receive all the parts that would make up the different materials in my render.
 These are the different sections of my board laid out. The dark grey section is the heat sensing and proof plate, the black sections represent the different "interfaces that would light up and display data in the presence of heat. As for the board, I really like the nice, simple beveled shape I've used, and that just emulates the simple, minimal form I'm going for.
 This is just a little overview of all the components on the board. Obviously the board's electronics would be far more complicated than that, and that's not shown here, but this is really just as an idea so that my classmates (my audience for my presentation) can get a good idea of what the project would look like.
 And here's the render I devised of the first form. The materials I've used are pretty much the materials I would hope to use for the actual product, so people can get a feel for what it would look like. The pot form is based off some pots we have at home, and I just did a really simple form, to give a sense of scale.
 So, after my embarrassing design oversight with the first one, I went back to the drawing board, and made some significant alterations to the form as a whole, so that the entire idea was simplified, the electronics were simplified, and the function was abstracted a bit further. The heat sensor would now transmit information as a whole across to the light ring shape, which would represent whether or not the pot was hot. How hot the pot is would be displayed in the red bars. The red bars would act as an extension of the ring, allowing the user to see how hot the pot was, based off how many of the bars were lit. When the pot started to cool down, the bars would slowly turn off, and ultimately, the ring would turn off to.
 The new elements I built into this form were the recessed circular sections. These now reinforces the design as something that serves as a presentation board, as these slots would serve a function as pockets for condiments and other additives for the meal. This allows the board to become a product, rather than just a safety solution.
 Another aspect I really wanted to bring into this project was switchless operation. When the pot rests on the platform, the weight of it would trigger a switch, turning the system on. This would limit the need for an ugly external switch, and ensure that the design would be as clean as possible.
So, with that in mind, I developed the first form of the Heat Indicator/Board.


Tuesday, September 24, 2013
INDN 212: Developing A Feasible Project
So, the two ideas that I've decided to pursue further are the idea involving the pot with the indicative heat strip, as well as the idea involving the ladder rest. Both ideas address problems close to me that have struck a chord. The first one addresses an endemic issue with ladder safety, so it just makes sense to get some work involving a common issue.
 So, the way I envision this product involves making a large steel plate that can be laid out on the grass, providing a large surface area for the ladder to be safely placed on. This device could be something quite small actually, perhaps it could also fold up and be attached to the ladder as a detachable accessory. To get the device to stay on the grass or earth, it could have small spikes that fold out of the base that the user could then use to embed the base into the earth.
There could be small handles on the sides of the device, making it easier to handle and control, and if I had a really ambitious team, we could even make the device have small jacks in it, so that you could raise up either side to make an angled platform for when the ground is sloped. Another idea was to have the platform have little pop-up recesses so that the legs of the ladder could sit on the platform without sliding.
All in all, I really like this idea, but I think if I were to go with it, I'd need to do a lot of refining and sort out a workable form.
 This is a completely different idea involving household kitchen safety, centering around the handling of pots and pans. This project could have a few different outlets, and I've decided to talk about my two favourites. The primary focus for this project is very specific. I want the user to receive visual clues as to when a pot is hot. Now, the way that I want the user to receive the information and how they can interact with that function is where I've divided the project into two slightly different areas.
The first idea is a pot that provides a visual cue as to when it is hot, so as to prevent the user getting burnt when they pick up a hot pot. The primary target group that usually suffer due to this hazard are young children and careless or distracted individuals. Providing a visual cue allows the users to receive extra information not always received when just looking at a hot pot. This indicator could take the form of a strip that adheres to the pot, or it could be a built in part of the pot, or it could even be a small scarf-like device that sits around the pot, and changes colour when the pot is too hot to touch.
The second idea that I have revolves around the potential of making a fully self contained system that acts as more than just a heat indicator for the pot. I think it could be a serving board for the pot, an interim point between cooking the food and serving it, or maybe something that combines a chopping board with a temperature gauge so that the user can find the optimum temperature to serve their food. This method of protecting the user could allow the object to be something large and self-contained, and could potentially incorporate a lot of functions.
So, the idea that I'm going to explore in more depth is the heat indicator. Stay tuned!

There could be small handles on the sides of the device, making it easier to handle and control, and if I had a really ambitious team, we could even make the device have small jacks in it, so that you could raise up either side to make an angled platform for when the ground is sloped. Another idea was to have the platform have little pop-up recesses so that the legs of the ladder could sit on the platform without sliding.
All in all, I really like this idea, but I think if I were to go with it, I'd need to do a lot of refining and sort out a workable form.

The first idea is a pot that provides a visual cue as to when it is hot, so as to prevent the user getting burnt when they pick up a hot pot. The primary target group that usually suffer due to this hazard are young children and careless or distracted individuals. Providing a visual cue allows the users to receive extra information not always received when just looking at a hot pot. This indicator could take the form of a strip that adheres to the pot, or it could be a built in part of the pot, or it could even be a small scarf-like device that sits around the pot, and changes colour when the pot is too hot to touch.
The second idea that I have revolves around the potential of making a fully self contained system that acts as more than just a heat indicator for the pot. I think it could be a serving board for the pot, an interim point between cooking the food and serving it, or maybe something that combines a chopping board with a temperature gauge so that the user can find the optimum temperature to serve their food. This method of protecting the user could allow the object to be something large and self-contained, and could potentially incorporate a lot of functions.
So, the idea that I'm going to explore in more depth is the heat indicator. Stay tuned!
Monday, September 23, 2013
INDN 212: Thoughts On Safety
So, our next project is all about safety. We have to analyze a range of situations and products and think about what we could do to make them safer. Alternatively, we can develop a new product, that serves as a preventative measure for danger, or one that serves as a warning system for danger, or if we really want to push it, we can develop an innovative radical new suggestions.
I'm inclined to look at the last option, as I'm having big difficulties with coming up with some ideas. That's the main reason for me doing this blog post, so that I get get some of my thoughts out onto the page and possibly come up with some ideas. That would be nice.
So, the first port of call is to choose some situations that I can see a new product based around safety or solving a dangerous situation. Initial thoughts and feelings were difficult to come up with. But I started looking at some of the suggested resources and thinking of ways in which I would feel safer doing specific tasks and the like. Safety in this project isn't just safety, it can also be interpreted as "improving quality of life" or making a product easier to use.
To get some in-home research done, I talked to both my family, as well as a few different family friends who have families, some of them with young children. Some of the most consistently brought up themes for safety were:
Kitchen Safety (Knives, Machines, Heat)
Electrical Safety (Sockets, Exposed Wiring)
Household Safety (Ladders, Ergonomic [Furniture])
Sports Safety (High-Speed Safety, Impact Safeguarding)
The ideas that have stuck with me through all the others appearing are:
Dynamic Knife Sheath
Knives are a source of a lot of kitchen-based injuries. One of the ideas that I've had so far involves kitchen knives having a sort of dynamic sheath to protect adults and children against unnecessary injury. Perhaps the sheath would be one that just sits on the blade and is taken off prior to use, or maybe it could be a dynamic, shifting sheath that encases the blade, and if the blade is used for cutting, the sheath shifts back with the movement of the knife, and once the cut is completed, the sheath pulls back down over the blade, protecting the user primarily against small accidental cuts.
Indicative Heat Strip
One of the things that's always struck me is that stoves have a heat indicator more than often (except gas heaters), but yet the pots never seem to have a heat indicator. I've burnt myself on the body of a pot more than once, and twice it's been because I didn't know it was hot. The idea that I have in mind is of a heat-sensitive strip that that can tell the user when the pot itself is hot enough to be dangerous. It wouldn't even have to be a progressive scale. The strip could just indicate if it is hot or not.
Socket Covers
Apparently these do actually exist, but they aren't always very good at what they do. Medicine jars are sealed against children opening them, perhaps socket covers could function in a similar way. With a twist-lock system in place, it would make it that much more difficult for a child to gain access to an electrical socket.
Ergonomic Encouragements
One of the things that came up often as well was a suggestion to improve one's posture, improving the quality of life as well as improving the health of the individual. The potential in this could be in a form of back support that is strapped around the chest, or potentially actually connected to the chair, allowing the user to feel the correct form with their spine and take up a good position.
Dynamic Impact Protection
One of the things that keep coming up are Non-Newtonian Fluids. And increasingly, I'm getting the vibe that they'd be perfect for a body armour of sorts. However, I think that that idea is definitely already out there, and I'm just setting myself up for some very difficult situations by trying to compete with global brands to come up with something that might beat their projects.
Ladder Base
One of the problems that I face when I'm using a ladder around the house at home is that around our house, we have a lot of grass and soft earth. This makes it very difficult to actually get a stable ladder and can pose a large number of risks. One of the ideas that I have involves making a portable support for such situations, a support that could be placed on the ground, and, being large and flat, spreads the weight around over a larger surface, ensuring the ladder is stable. I think there is potential in this idea, because the device could even be something that can be mounted to a ladder for transport and fold up, as well as potentially having ladder leg supports, to ensure safe ladder usage.
I think what I'll do next is sketch up my favourite two or three ideas, and themselves we where I can't wake it from there.
Sunday, September 15, 2013
INDN 212: Final Thoughts & Photos
Well, it's finished now. I still don't know if it's going to work in the presentation. I don't know if I broke something last night, or maybe my wiring was just dodgy from the beginning. The thing is, all the individual components worked on their own. The lights worked, the muscle wire worked, the motion sensor worked. All of it was functioning. But then when I brought it together, something must have gone wrong. Or maybe the power supply really just wasn't supplying the amount of power I needed. Because I know for a fact that I needed at least 10 Watts. Which smaller power supplies would have a problem supplying at 12VDC.
I just really hope the tutors see my blog and see my progress and can say "Yup, he didn't just skimp on the work and hand in something that doesn't work." I did have working componentry and a whole heap of bad luck. Ah well. I just hope it works tomorrow. I wish I'd had an extra day to try and sort out the problem. The worst part is that I've been working on this for the past 3 weeks, and it's decided to stop working now...
Anyways, I'll let the pictures do the talking.


Good luck, me!
INDN 212: Getting Some Sweet Shots!
So, late tonight, when I was about to start taking photos, disaster struck. For some reason, my light system didn't work any more. I have a suspicion that the power supply I was using simply wasn't supplying enough juice, or possibly it broke. I really hope it's just that, as I have another power supply laying around somewhere that can provide more power. But at present, I can't take any photos of it lit or working, as that's not possible.
 Fortunately, the materialities of the light are still very beautiful, even when the light isn't working. The pendants of the lamp make for some really nice photo opportunities, so I'm glad of that much. I just wish it would work.
 I'm pleased with the congruency of all the shades. The two smaller ones feel like refined iterations of the large one, which is exactly what I wanted them to feel like. The metal on top then feels at one with the shades, as the pieces of aluminium are all the same, and yet they add to the two different sorts of shades in completely unique ways.
 This shot feels like a sort of disco shot. I just had to put it in the preliminary bunch of shots.
 I'd love to have shown these lights lit. I'll let you do the imagining. They were really, really bright. And made the wood shine really nicely and warmly.
 I'm really pleased with the way the three main looks come together. The aluminium, the waxed beech, the cotton cabling, it all worked out in the end, and the three look fantastic together, so ultimately even if the whole thing doesn't work, I still have something beautiful. And my idea is in the project. I had a really good concept, so hopefully that will carry a lot of weight.
 I can't quite believe how beautiful the beech looks in this light with my favourite wax on. It's such a wonderful product and it just enhances the wood in such a nice way. *love*
 Less of a disco shot, and more of one that actually shows what they look like with real lighting.
 The ceiling mount turned out pretty alright! It's definitely not my favourite part of the construct, but it could be a lot worse. The white spray paint came out really nicely, but next time I'd definitely give it a bit more time to dry, as when I carried it from home, the warmth from my hands softened the not-quite-dry paint a bit and my cloth that I used to carry it left a bit of an imprint.
Here's to hoping that it works tomorrow.


Here's to hoping that it works tomorrow.
Subscribe to:
Posts (Atom)