Showing posts with label INDN 211. Show all posts

Tuesday, June 18, 2013

INDN 211: Supporting Course Booklet

After all that work, we also need to create a booklet detailing our work for the whole process for the entire course. Our tutor recommended that we doe something that has a lot of pictures and little text, but I feel that text is important to explain my rationales for doing what I've done.

So, without further ado, my work from the course INDN 211:


INDN 211: Final Project: The Metal Field

So, looks like my project is all done!! We present tomorrow, and I'm really looking forward to it. It's the last hand-in of the trimester, and then I get a good few weeks off where I get to do whatever I like. Bliss. I'm stoked.

The Metal Field is a kinetic sculpture where I sought to capture the sound the wind makes when it rustles through the grass and trees. Emulating nature while industrialising the sound was a key focus of my abstraction. The base is Jarra and guitar strings, which provides a suitably ethereal sound when the steel pendulum swings across them.

I'll let the photos and video do the rest of the talking.

The Metal Field

Boiled Sap Jarra Detail

Material Interaction

Material In Motion

Sculpted Jarra


Sunday, May 26, 2013

INDN 211: Table Talkers And Fancy Pictures

Wow, so it's all done. I'm actually really, really happy with this project. It's not been one of those thing you do at the last minute. It's been something that's been in the work for weeks. I've had the components lying around for the past few days, and putting them all together has been the last little bit to do.

But I'm so pleased with the outcome. And the photos, after a bit of work, turned out just the way I wanted them! 

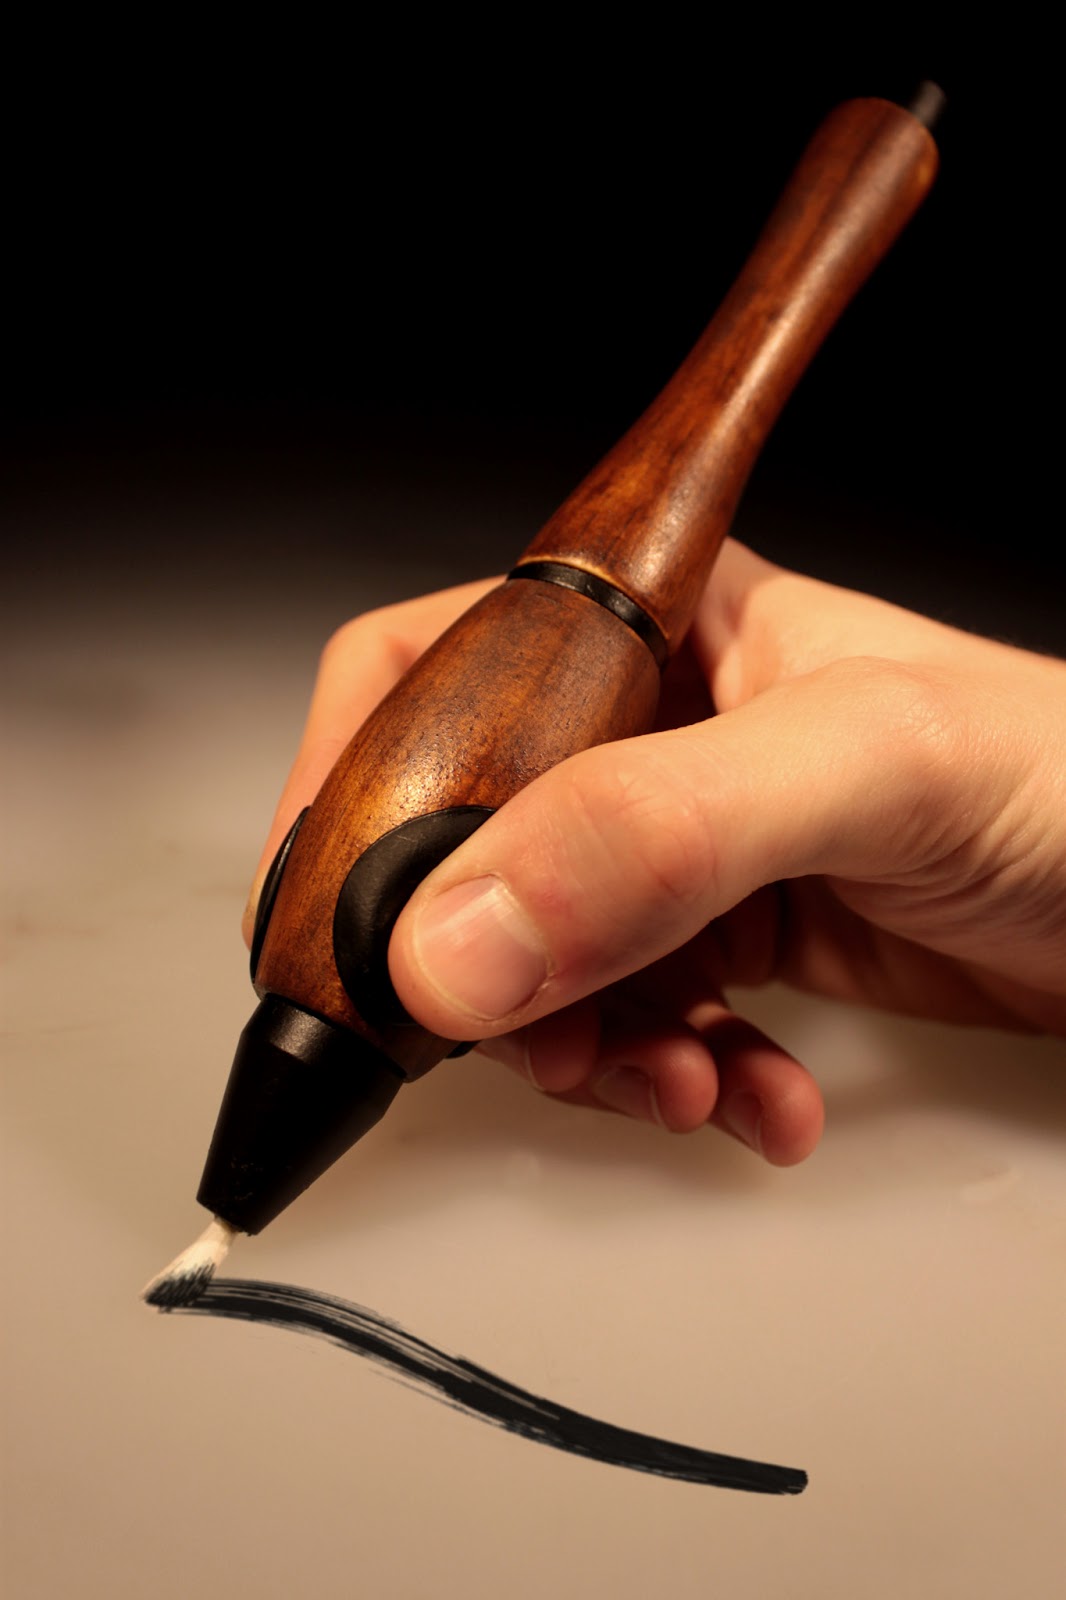
For the photos, I really wanted to convey a more antique aesthetic. The dark stained wood makes the set feel old, a consideration I wanted to target at the older market. The lighting that's been put in the photo studio recently really makes the pieces feel like a museum piece...which is pretty exciting.

As well as the photos of the product, we also needed to make a poster, detailing the project.

I'll let the photos do the talking now.

1: Collective Apparatus

2: Assembled Apparatus

3: Focused Gripping

4: Minimal Holding Effort

5: Considered Application

Tuesday, May 21, 2013

INDN 211: Completed Set!

It's almost there! The project is nearing completion, and I am slowly filling the box to its brim with finished goodies. The grips are all stained and varnished, the box is painted, and the holding section is working well at holding the different pieces in place.


The pieces all sit in there rather nicely, allowing for each piece to be completely visible, while still keeping the box compact and not over-sized. The pieces all get their individual space, while at the same time keeping an order coherent.

The pieces actually work really well together! They form a coherent whole, and I feel the over sized length is quite elegant and allows the pen to balance nicely. Some of the sizes were developed mostly out of intuition, so I'm glad that they worked out nicely. The walnut looks decently aged, while still looking classy enough to be a new product.

And this is the full set! Next, and finally, we'll take a step into the photo studio, to make the piece really shine.

Sunday, May 19, 2013

INDN 211: Box & Instructions Development

The box will be a crucial element for this project, as it really ties it all together. Without the box, the pieces will all just lay around randomly. The box will provide a uniting relevance. It will also provide a medium for the explanation and instructions to sit on, allowing people to see the set as a complete, with instructions and diagrams.

The top of the box will have an illustration of the pen tool, as well as the name. You might just be able to see the pieces I'm laser cutting on these pictures, as the lines are very thing, making them hard to see on the white. I find moving my head down and looking up at the screen makes them more visible.

I went with a pretty simple interlocked box design, as this will make the box nice and stable, as well as provide enough space to have a little cross pattern to decorate the sides of the box.

After getting it laser cut, I proceeded to put it together, gluing together the different components. This was messy, and resulted in a lot of glue seeping through gaps. C-c-c-c-craft knife demolition time!

This is looking at the bottom of the box. You can see the slots poking through, as well as the side patterns attached to the box. The box is actually surprisingly stable, given that it's made of 4mm hoop pine ply. I really like the look of the pine too, and once it's varnished it should have a nice shine.

For the lid, I made two separate sections, and then glued them together. The underside of the lid provides more information about the product, as well as serving as an "opening letter" of sorts for when the consumer opens their new present. The etching is really nice and clear, and fulfills it's purpose nicely.

As a final addition, on the last post, I didn't include a look at the most up to date photos of the grips. Well here you are! The black grip against the walnut of the wood looks rather classy. And next to the pine, it looks even darker still. Very nice.

I'm so close to finishing now!!

Saturday, May 18, 2013

INDN 211: Tertiary Production Phase

Well, the plastic has been vacuum formed, and I've gotten the CNC lathed pieces of steel back. One of the first things that I needed to do was to mould these sections to the wooden grips. The reason I needed to do that was so that they'd actually fit. The pieces were vacuum formed flat, with only the raises in them, however, for them to fit on the grips, they needed to have a much more defined curve in them, a unique fit for each separate raised section.

The next thing I had to do was spray paint them black. I chose black because it would ultimately be quite close to the walnut colour the stained wood would finally get, while at the same time being different enough to make a contrast.


Wanting to have an element of uniformity, I decided to roll with the CNC lathed sections being the same black colour as the grips. This usage of only two colour sets (besides the white brush tips) will keep the contrast minimal and make sure that I have a single unified aesthetic.

I got three separate brush sizes, measured them up, cut them up, and then drilled the holes in the steel tips to fit the brushes. These brush tips I then glued into the steel points, and then I wrapped the brush elements in masking tape before spray painting everything. Once it had all dried after multiple coats of paint, I went to work on making the sections fit into the grips. This mostly just involved screwing them in and out of the grips multiple times, as as to wear them in a bit.

Looking lovely! I then gave the same treatment to the discs and the weights. Original plan was to put some white dots in little notches I drilled into the tops of my weights, but I actually think I'll leave that part out, as it doesn't really add that much, and it is another colour element that I don't need.

Meanwhile, in stain-land amidst brown and sticky fingers and messy paint brushes, I'm reaching the point of completion. Two base layers of the Sikkers HLS, followed by two top coats of the Filter 7, and the grips are looking decently dark, while still retaining the beautiful grain.

Following that, I then attached the grips to the first two and the discs to all five of them, which was a mission in itself. Then I followed up all the stain with a top coat of varnish, to give the pieces a consistent semi-shiny satin finish. Looking good!

Thursday, May 16, 2013

INDN 211: Secondary Production Phase

Now that the main parts of the pens are done, it's time to be looking forward to the next sections of the project. Since the project itself is really about the learning to hold the pen and then painting while doing that, it makes sense to a have a little paint pot to go with the project. Fun! Actually, the paint pot was the cutest little thing I got to make on the wood lathe. I did take a bit of a chunk out of it, but that didn't really bother me too much, since it was on the inside and once the things were stained, that would be okay since it would be less visible.

After creating the paint pot to my satisfaction, I really started thinking about stains in earnest. The actual stains themselves would be quite a defining feature of my project. Since I am targeting an older market, one of my first thoughts of an ideal of value drifted to the idea of antiques. Now pine is not a long-lasting and strong wood, so I decided to make the wood look like something that could be quite antique.

Walnut. That's a beautiful wood that however would take far too long to lathe and sculpt, but could certainly be imitated with some good stains.

I first tried my hand at some staining on my first attempt at the stem, and I attempted that with some cedar decking stain. Honestly, it looks pretty darn shoddy. That wood looks orange and pretty cheap. So I went out and got some decent stains. I went for the "Sikkers HLS" and "Sikkers Filter 7", both of which came in perfectly sized little pots. The trick with these two is that they work together, one as a base stain, and then one as a top coat.

I went back to the wood workshop first after talking to my tutor and made another grip, which would bring the set total up to five. My tutor believes that that's a better number to have, as it has a midpoint. I must say after thinking about it, it does make sense.

Another element that I built it was a small pattern done on the thumb of the grips, so as to make it clear to the user where the fingers go. I also expanded on the actual sunken parts of the grips, giving all the grips indents, however, from the large grip down, they rapidly diminish in size as the overall perimeter of the cylinder decreases.


The first layer of the walnut stain that I put on my work is looking really good, but at the moment it's still far too red to look the way I want it to. But that will come. I also, as you can see, attached the threaded rod to my stem, as it makes for more sense to have the rod attached to that that all 5 of the grips individually.

I'm going to have to stain these pieces before I can attach the vacuum formed sections, as the stain would make a bit of a mess on the plastic.

The next section is where I turned to some technology. We fortunately have a CNC lathe downstairs which we're allowed to have stuff made on. Making the paintbrush nibs on the manual lathe would be a bit of a trouble, so I'm really glad I don't have to worry about these sections. Our workshop technician also told me he can easily put a thread on the end for me, which is fantastic.

I'm going to have three of these bad boys made up, since there will be three different sizes of paintbrush tip.

These discs I'll make on the lathe myself, as they're very easy to make. I'll make them out of the steel as well. These discs will eventually be glued to each one of the grips, so as to act as a sort of washer, as well as an aesthetic element, so as to break up the two segments of wood that are the stem and the grip.

Finally, the last piece will also be done via CNC magic. These little things will be the weights that sit at the back of the pens. This will allow the user to customise the balance of the pen in the hand. Ideally, with the maximum weight on the pen, the pen should actually pull up from the page, pushing the grip into the users hand more, while the small one will not. Our workshop technician should also be able to put a thread on these little things too.

Monday, May 13, 2013

INDN 211: Primary Production Phase

Well, now I am fully into production mode. I started working today on the wood lathe, which was an interesting, at times difficult, but all of the time very, very fun. The way the wood lathe just allows you to very quickly sculpt a piece of wood into a rotationally symmetrical form is fantastic. I love it.

So, I started out with my stem, so that I could practice removing a lot of wood and also as it allowed for a lot of room for error. The general sculpting of the wood took little time once I realised how easy it was to take off large amounts of wood very quickly.

Once I had my stem form, I drew out the forms for my 4 grips, and then started sculpting them. The form was rather similar, but the diameters of the sections were the really important parts. The front of the grips needed to be 20mm, while the back end needed to be 25mm, so that it would fit together with the grip well.

After about 2 hours in the wood workshop, I finally had my little family of grips  all done and dusted. However, that said, I still had to sculpt the actual sections into the grips where the fingers would hold. This took a careful amount of planning and marking out, as the grips I had now designed were a bit different to the original clay forms I was working with. So I marked the forms out , and then I used a circular sander to carve in the grooves.

At the larger grips this was rather easy, however it quickly got much more difficult when I got the second smallest. The last one I decided would not have any grip segment, to add to the difficulty of the training.

Following that section of the work, I then had to sand down the sections, as the circular sander had done a good, fast, but rather rough job. So the notches still needed a lot of refining. But, once I reached that stage, it was time to start thinking about the crucial element of the project, the vacuum forming.

The way I had planned to do my vacuum forming for this project was to mould the small raised sections out of clay directly onto the wood grips, and the remove the clay and place it onto a board I could do my vacuum forming over. This was a bit of a concern at first, as I really wasn't sure how it would work. Fortunately, it worked beautifully, however, the clay was a one-time-use. The clay somehow lost its consistency as it had the plastic shrunk over it. The clay was no longer staying together and keeping its form.

But, since it worked perfectly, this actually wasn't a concern at all.

Sunday, May 12, 2013

INDN 211: Refining & Resolving

Well, now that I've done some research into what my target clientele thinks of the work in progress, it's time to start refining what exactly it should look like. For this project, form has to completely follow function, as the function is absolutely key for this project.

The material choices for this project will be fairly important. Ultimately the project is completely about comfort and ensuring that the hold is as easy and as informative for the muscles as possible. This project is essentially an extremely pure study into ergonomics for a fairly specific group.

One of the things that is rather important is ensuring that the pens have a decent amount of weight to them, as the first few levels of the pen rely on a decent amount of weight being behind the grip. The grip then sits in the hand a little bit better when having more weight.

I'm going to work the forms I want on the wooden lathe, because if I create the pens out of metal, I think I might be pushing the weight of the pens to a bit of an extreme level. To create the edging of the sections for the fingers, I want to vacuum form the plastic and then mould it over the curve of the pen grip itself, so as to ensure it fits well.

Now that I understand how I want to make my objects, I needed to experiment with form a little bit more. After previously drawing the pens as rugby-ball shapes, I realised that for optimum comfort, the pens actually needed to be a little more sophisticatedly formed than that. So I looked into form, ans started to slowly isolate a form that worked and looked sophisticated at the same time.

After isolating the form that I wanted the pens to take, I made some small alterations to the design, including the addition of a weighted back end, so as to lighten the load of the pen at the front, and make the learning to write easier for the user.

The materiality of the design was another important section in this design. The body of the pen is planned to be wood, while the tip and the weighted end are going to be metal, for obvious reasons.

After talking to my tutor, the game plan has changed. Rather significantly, I might add! The idea of options and customisation were suggested, and as I result, I've revisited the design and decided to make it much more customisable for the user. Rather than having one pen for each segment, why not make the tips, weights, and handles interchangeable on a single stem.

Another very important element was the suggestion of the pen set not actually being a pen set, but rather a paintbrush set, which would serve two purposes. First, the user would be forced to eventually graduate from the set into a normal pen, since you can't exactly use a paintbrush for everyday situations. Secondly, it could potentially introduce the user to a new hobby, namely that of calligraphy. Calligraphy is a perfect start for this set, since the pen will be large and heavy, and the forms of calligraphy are an excellent start for someone wanting to relearn to write.

Next, the production begins!

Saturday, May 4, 2013

INDN 211: Investigative Market Research

Having decided on exactly what the project is going to be about and how it's going to work, model making is key to moving forward here. To find a form that worked, I started off with some clay models, establishing a comfortable hold for a sizable pen. The actual size of the first level of pen makes it really easy to hold. 

The combination of the raised segments and the dipped parts of the pens make this pen a breeze to hold, and the fingers practically stay there of their own accord, so it's a perfect first place to start. The raised sections in the level are very prominent, but they, like the dipped sections, will decrease with level.

The second level will see the plastic sections slowly receding, resulting in a more streamlined approach to the form. The chunkiness is definitely still there, resulting in a part-one-part-another form that sits between the main form approaches of the pens.

Here the pen is reducing in girth significantly, and all the components are receding, ensuring the user is slowly moving towards a point where these pens are no longer necessary. The pens are teachers and tools in one. Eventually they are designed to give way to a normal tool, which is what the user is really aiming for.

This pen sits on the border of the kit and the real world. This pen will be the boundary tool, the one from which the user has to make the step away into the "real world". Here, they graduate to a normal pen, and return themselves the freedom of being able to write anywhere with anything.

One of the suggestions by my tutor was to talk to my grandparents regarding the pen design. Both in their 80's, they are a little beyond my target persona in age, but much of the aspects that define my persona are inherent in their personalities too. The desire for independence and want for freedom, while refusing to want to rely on others is a strong element in their personae.

Ultimately my project is about equality and equal opportunity for all. I want to give people the opportunity to succeed, and my product wants to facilitate this and make it as easy at it could possibly be without sending them to a clinic.

My grandparents really liked the form of the model. They felt like it was easy to hold, and would make a good set of pens to work your way up. They did very much like the way the pen had a raised segment as well as a deep section for the pen to sit on your fingers with ease.

One of the issues that they raised though was the possibility of a longer stem, so that there was more support for the back of the hand. An idea that my tutor suggested that would completely encourage the user to wean themselves off the pens would be to make the pens not pens, but rather make them paintbrushes, which would allow for consistent learning, while at the same time ensuring that the user takes the final step.

Another idea that was tossed around was the idea of a kit that could be dissembled as well as customised. This could involve making the different handles separate pieces, as well as making the stem into its own independent piece which could be attached to the various segments.

A suggestion from my grandparents was also to possibly add weights to the back of the pens, as the pens could possibly be rather heavy, and balancing them at the back would give the pens more lift, as well as ensuring the balance of the pen was ideal for the task at hand.

My grandparents had a lot of good ideas, and this means that I'll have a lot to work with, which is great. Making sure that the idea works with the clientele is really important, as I've now discovered. Definitely something to consider for the next projects in the future.